

- Charging Dock Flex for iPhone 5 Parts
- Category:iPhone 5 parts
- Model:
- View:2224
Detail
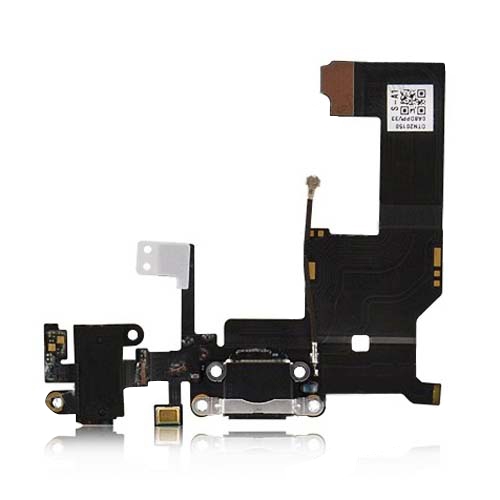
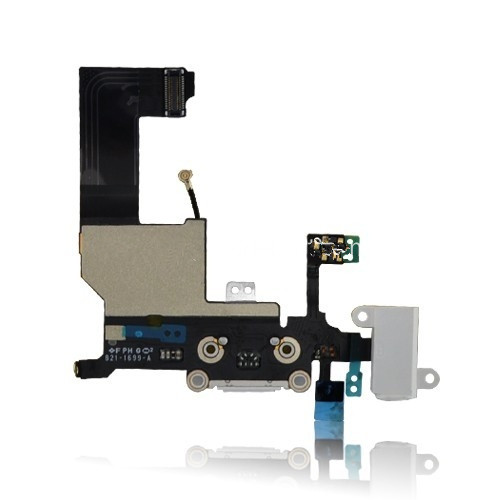
Charging Dock Flex for iPhone 5 Parts
Charging Dock Connector Flex cable for iPhone 5 is in the bottom of mobile. It is used to charge the smartphone. Somebody also call it the Charging Dock Ribbon or USB flex cable. In spite of other version, the charging dock flex and headphone audio jack flex are assembled together. This backup parts for iPhone is used to replace the damaged charging dock flex cable..
Charging dock and Headphone Jack Flex feature
Weight: 15g
Color: Black and white
100% new and original Parts for iPhone 5
Charging Dock flex cable + Audio jack headhone flex cable
Compatible: for iPhone 5
Warranty: 12 months
Package Include:
1x Dock Connector Charging Port and Headphone Jack Flex Cable

How to replace the Charging dock flex for iPhone 5
- Lay overlapping strips of clear packing tape over the iPhone's display until the whole face is covered.
- Remove the two 3.6 mm Pentalobe screws next to the Lightning connector.
- Regardless of the tool you use, you need to be sure you pull up the entire display.
- Close the handle on the iSclack, opening the suction-cup jaws.
- Place the bottom of your iPhone in between the suction cups, against the plastic depth gauge.
- Open the handles to close the jaws of the iSclack. Center the suction cups and press them firmly onto the top and bottom of the iPhone.
- Hold onto your iPhone securely and close the handle of the iSclack to separate the suction cups, pulling the front panel up from the rear case.
- Peel the two suction cups off your iPhone.
- With a plastic opening tool, begin to gently pry the rear case down, away from the display assembly, while you pull up with the suction cup.
- Continue to pry up around the sides of the front panel assembly, detaching the clips along the left and right side.
- Lift the front panel assembly slowly up to about 90 degrees from the rear case.
- Remove the following screws securing the front panel assembly cable bracket to the logic board
- Remove the front panel assembly cable bracket from the logic board.
-
Use a plastic opening tool to disconnect the three front panel assembly cables: Front-facing camera and sensor cable, LCD cable, Digitizer cable
- Remove the front panel assembly from the rear case.
- Remove the following two screws securing the metal battery connector bracket to the logic board
- Remove the metal battery connector bracket from the iPhone.
- Use a plastic opening tool to gently pry the battery connector up from its socket on the logic board.
- Remove the battery.
- Use the tip of a spudger to pry the cellular data antenna cable connector up from its socket on the logic board, just above the speaker enclosure.
- Remove two screws securing the top logic board bracket to the rear case
- Remove the bracket from the top of the logic board.
-
Use the flat end of a spudger to disconnect the following three cables from the logic board: Upper interconnect cable, Button assembly cable, Lower interconnect cable
- Remove the two 1.3 mm Phillips screws from the inner top of the rear case.
- Remove the single 1.2 mm Phillips screw remaining in the mid-section logic board bracket.
- Remove the mid-section bracket from the logic board.
-
Use a spudger to pry the Lightning connector cable connector up from its socket on the logic board.
-
Gently peel the cable back and out of the way of the logic board.
-
Depress the SIM card release on the right side of the iPhone with a SIM card eject tool or a bent paperclip to eject the SIM card tray.
-
Remove the following screws securing the logic board to the rear case
-
Rotate the logic board assembly toward the battery side of the rear case
-
Remove the SIM card tray from the iPhone
- Use the tip of a spudger to pry the Wi-Fi antenna cable connector up from its socket on the underside of the logic board.
- Remove the logic board assembly from the rear case.
- Remove the screws securing the Lightning connector and speaker enclosure assembly to the rear case
-
Use the flat end of a spudger to gently pry the Lightning connector and speaker enclosure assembly cables up from the rear case.
Make sure you get the spudger under the large - Remove the Lightning connector and speaker enclosure assembly from the rear case.
- Gently peel the speaker assembly away from the Lightning connector ribbon cable.
-
Carefully peel off and remove the grounding cable from the edge of the headphone jack.
Congratulations, the the Charging Dock flex cable for iPhone 5 is working again.


 anandacn


