


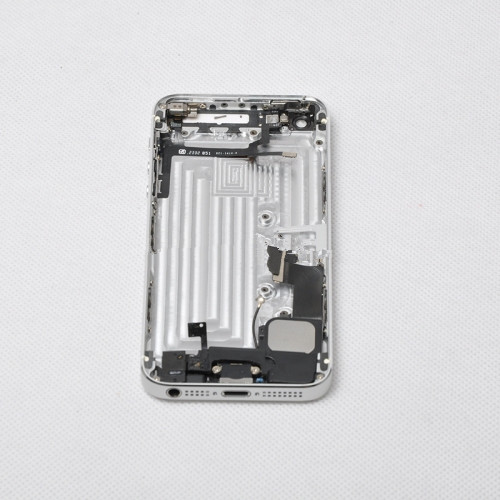


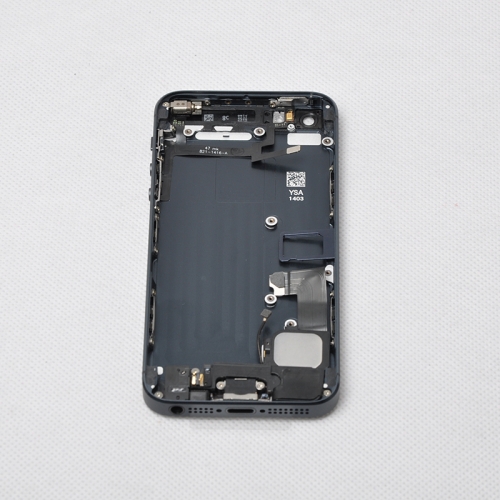
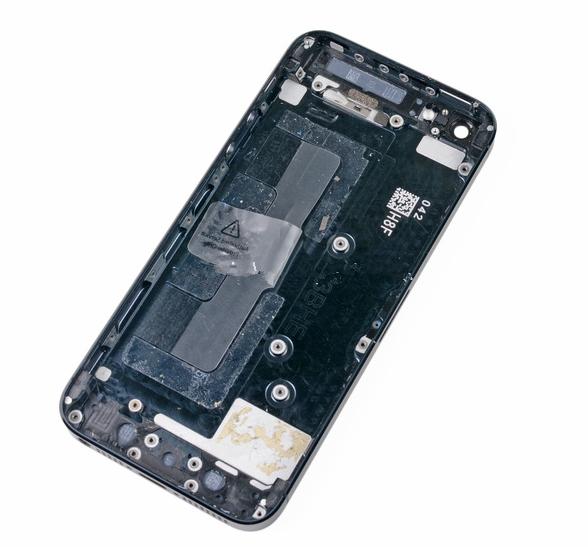
- Back Housing with Small Parts for iPhone 5
- Category:iPhone 5 parts
- Model:
- View:2520
Detail
Back Housing with Small Parts for iPhone 5
Many small parts are assembled into the Back Housing for iPhone 5, such as the Power/volume/mute flex, Charging dock flex cable, Wifi antenna, Loudspeaker... If you damage the battery door of iPhone 5, it is not so easy to take off all small parts and make a replacement. This Back housing with small parts is a good choice for you. All those small parts are pre-installed, you only need to make a whole replacement, very easy to operate.
-
Replacement Back Housing assembly for iPhone 5
- Weight: 80g
- Color: black, silver, gold
-
Standard Parts for iPhone 5 replacement, fix mobile perfectly
- Material: special alloy
- Made by third factory, not original
-
New and good quality
-
Package include: 1X Back housing + Power flex cable + Charging Dock flex + Loudspeaker Assembly
Compatible
- for iPhone 5
How to replace the Back Housing for iPhone 5?
Step 1.
If your display glass is cracked, keep further breakage contained and prevent bodily harm during your repair by taping the glass.
Lay overlapping strips of clear packing tape over the iPhone's display until the whole face is covered.
Step 2.
Remove the two 3.6 mm Pentalobe screws next to the Lightning connector.
Step 3.
Regardless of the tool you use, you need to be sure you pull up the entire display.
If the glass begins to separate from the plastic, as shown in the first image, slide a plastic opening tool between the plastic frame and the metal phone body to pry the metal clips out of the case.
Step 4.
Close the handle on the iSclack, opening the suction-cup jaws.
Place the bottom of your iPhone in between the suction cups, against the plastic depth gauge.
Open the handles to close the jaws of the iSclack. Center the suction cups and press them firmly onto the top and bottom of the iPhone.
Step 5.
Hold onto your iPhone securely and close the handle of the iSclack to separate the suction cups, pulling the front panel up from the rear case.
The iSclack is designed to safely open your iPhone just enough to separate the pieces, but not enough to damage the home button cable.
Peel the two suction cups off your iPhone.
Step 6.
Press a suction cup onto the screen, just above the home button.
Step 7.
While holding the iPhone down with one hand, pull up on the suction cup to slightly separate the front panel assembly from the rear case.
With a plastic opening tool, begin to gently pry the rear case down, away from the display assembly, while you pull up with the suction cup.
Step 8.
Continue to pry up around the sides of the front panel assembly, detaching the clips along the left and right side.
Step 9.
Once the clips have been released on the bottom and sides of the front panel assembly, pull the bottom of the assembly away from the rear case.
Lift the front panel assembly slowly up to about 90 degrees from the rear case.
Step 10.
Remove the following screws securing the front panel assembly cable bracket to the logic board: 1.2mm, 1.6mm.
Step 11.
Remove the front panel assembly cable bracket from the logic board.
Step 12.
Use a plastic opening tool to disconnect the three front panel assembly cables:
Front-facing camera and sensor cable
LCD cable
Digitizer cable
Step 13.
Remove the front panel assembly from the rear case.
Step 14.
Remove the following two screws securing the metal battery connector bracket to the logic board: 1.8mm, 1.6mm.
Step 15.
Remove the metal battery connector bracket from the iPhone.
Step 16.
Use a plastic opening tool to gently pry the battery connector up from its socket on the logic board.
Step 17.
Remove the battery.
Step 18.
Use the tip of a spudger to pry the cellular data antenna cable connector up from its socket on the logic board, just above the speaker enclosure.
Step 19.
Remove the following two screws securing the top logic board bracket to the rear case: 1.5mm, 2.3mm.
Step 20.
Remove the bracket from the top of the logic board.
Step 21.
Use the flat end of a spudger to disconnect the following three cables from the logic board:
Upper interconnect cable
Button assembly cable
Lower interconnect cable
Step 22.
Remove the two 1.3 mm Phillips screws from the inner top of the rear case.
Step 23.
Remove the single 1.2 mm Phillips screw remaining in the mid-section logic board bracket.
Step 24.
Remove the mid-section bracket from the logic board.
Step 25.
Use a spudger to pry the Lightning connector cable connector up from its socket on the logic board.
Gently peel the cable back and out of the way of the logic board.
Step 26.
Depress the SIM card release on the right side of the iPhone with a SIM card eject tool or a bent paperclip to eject the SIM card tray.
Remove the SIM card tray from the iPhone.
Step 27.
Remove the following screws securing the logic board to the rear case:
Two 2.3 mm Phillips screws
Two 2.7 mm standoff screws.
Step 28.
Rotate the logic board assembly toward the battery side of the rear case.
The flash surround is adhered to the flash unit and the rear case. If it stays on the rear case remove with tweezers and mount it back on the flash unit.
Note: when reassembling your device, be sure that the lower interconnect cable is not tucked underneath the logic board.
Step 29.
Use the tip of a spudger to pry the Wi-Fi antenna cable connector up from its socket on the underside of the logic board.
Step 30.
Remove the logic board assembly from the rear case.
While your logic board is out of your phone, keep it on a grounded mat to prevent any damage to the circuitry.
Step 31.
Remove the following screws securing the Lightning connector and speaker enclosure assembly to the rear case:
One 2.5 mm Phillips screw
Two 3.3 mm Phillips screws
One 2.9 mm Phillips screw
Two 1.5 mm Phillips screws
One 2.8 mm Phillips screw
Step 32.
Use the flat end of a spudger to gently pry the Lightning connector and speaker enclosure assembly cables up from the rear case.
Step 33.
Remove the Lightning connector and speaker enclosure assembly from the rear case.
Step 34.
Remove the following screws securing the vibrator bracket and motor to the rear case:
One 2.3 mm Phillips screw
One 1.7 mm Phillips screw
One 1.6 mm Phillips screw in the top of the rear case
for more steps, please go ifixit to read more details.
Looking for ideal iPhone 5 Back Housing Parts Manufacturer & supplier ? We has a wide selection at great prices to help you get creative. All the iPhone 5 Back Housing Assembly are quality guaranteed. We are China Origin Factory of iPhone 5 Housing Replacement. If you have any question, please feel free to contact us.


 anandacn


